

Top 7 Essential Tips for Perfect LP SmartSide Installation and Maximum Warranty Coverage
Select a Certified and Experienced Professional Siding Installer
LP SmartSide siding installation rewards precision. Because LP SmartSide is an engineered wood siding system, your warranty coverage depends on strict adherence to the manufacturer’s installation instructions and local codes. A seasoned, professional siding contractor won’t just make it look good—they’ll build a moisture-managed, code-compliant assembly that keeps your warranty intact and your exterior performing for decades.
Look for proof of LP-specific experience, not just general exterior home remodeling. Ask to see recent LP SmartSide projects, confirm the crew (not just the salesperson) has LP training, and make sure they can explain how they prevent moisture intrusion at transitions, openings, and rooflines. The right installer will volunteer details about fasteners, clearances, and finishing practices that create durable siding installation outcomes.
!LP SmartSide siding installed by Expert Exteriors
Use this quick vetting checklist:
- Confirms use of corrosion-resistant, manufacturer-approved fasteners and proper nailing (flush, not overdriven) into framing.
- Details required clearances (e.g., above grade, concrete, and roofing) and kickout flashing at roof-to-wall intersections.
- Specifies WRB integration, head/step flashing, Z-flashing at horizontal joints, and joint flashing at lap butt joints.
- Primes/seals all field-cut edges and penetrations with approved products; outlines finishing schedule.
- Provides written commitment to follow LP’s current installation instructions and siding warranty requirements.
- Documents the job with photos and keeps labels/lot numbers for your warranty file.
- Protects materials from moisture on-site and won’t install over wet sheathing or in saturated conditions.
Demand a clear, written scope that lists product profile, exposure, trim details, joint treatments, and sealants by brand. Your contract should call out installation over properly spaced studs or approved sheathing, stud layout verification for nail placement, and corrective steps for any overdriven nails. A final punch list and homeowner maintenance guide (caulking, repainting intervals, vegetation/sprinkler clearance) help preserve coverage.
Workmanship matters as much as materials. Choose a professional siding contractor that stands behind their craft with a long-term labor warranty and responsive service. In Brookfield and nearby communities, Expert Exteriors’ expert LP SmartSide siding installers pair manufacturer-compliant practices with a strong workmanship warranty, giving you documented protection from day one.
Prioritize Proper Material Storage and On-Site Handling
LP SmartSide siding installation starts long before the first panel is fastened. Engineered wood siding is durable on the wall, but prolonged moisture exposure or rough handling on the ground can lead to edge swelling, bowing, and coating damage that voids coverage. In Wisconsin’s freeze-thaw cycles, that risk is higher, so jobsite storage and staging deserve a clear plan tied to siding warranty requirements.
Follow these storage and handling practices to protect materials and maintain eligibility for warranty claims:
- Keep units flat on level, elevated dunnage with uniformly spaced supports (typically 16–24 inches apart) to prevent sagging. Never store directly on soil or concrete where water can pond.
- Leave factory packaging intact until installation. If outdoor storage is unavoidable, place bundles under a roofed area or cover with a breathable, waterproof tarp that sheds water while allowing air circulation—avoid wrapping tightly in non-breathable plastic.
- Stage pallets away from traffic, sprinklers, and snow piles; slope covers so meltwater drains off. Do not lean lengths vertically; carry long pieces with two people and lift panels from underneath rather than by the ends.
- Inspect upon delivery for crushed corners or compromised wrap, document issues with photos, and separate any wet pieces to dry thoroughly before use. Don’t pre-cut more boards than you can install that day to minimize exposure.
On active exterior home remodeling sites, thoughtful material flow matters. Plan a clean, dry path from drop-off to cutting and installation areas to avoid dragging pieces through mud or gravel. Use soft straps or spreader bars when moving units with equipment to avoid banding marks. Keep touch-up paint and sealants in a temperature-controlled area, and protect prefinished faces from tools and fasteners stored on top of bundles.
A durable siding installation is as much about process as product. If you want the peace of mind that every step aligns with manufacturer guidance and the fine print of siding warranty requirements, work with a professional siding contractor that treats jobsite logistics as part of quality. Expert Exteriors follows strict storage and handling protocols for LP SmartSide and offers streamlined quality siding replacement solutions tailored to Brookfield’s climate and building practices.
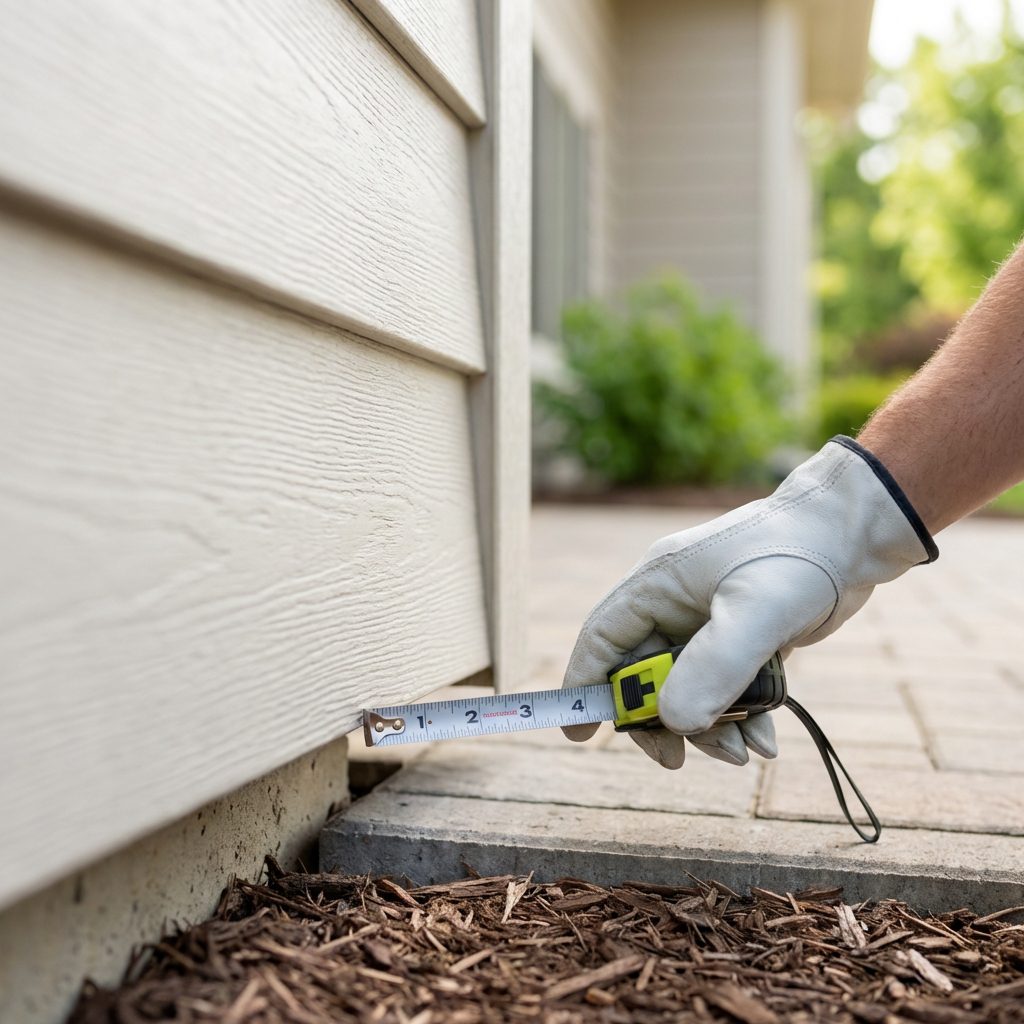
Maintain Required Ground and Roof Clearances for Moisture Protection
Moisture is the number one enemy of engineered wood siding, and the best defense is proper clearance. During LP SmartSide siding installation, keeping panels and trim lifted off soil, roofing, and hard surfaces reduces splash-back, capillary wicking, and ice buildup that can lead to swelling or decay. It’s also central to meeting LP’s siding warranty requirements, which call for specific minimum gaps at the bottom edges and roof-to-wall transitions.
Use these baseline clearances to protect your investment and maintain coverage:

- Maintain at least 6 in. of clearance between the siding’s bottom edge and finished grade, landscaping, or mulch.
- Hold a minimum 1 in. gap above roofing, decks, patios, walks, and steps, with metal flashing where required.
- Keep siding edges off masonry by at least 1 in., using proper flashing and sealants per LP details.
- Provide kick-out flashing at roof-to-wall gutter terminations to divert water away from the siding and trim.
At roof-to-wall intersections—common above garages and dormers—step flashing should integrate with the roofing and terminate into a properly sized kick-out flashing at the eave. Keep the bottom course of siding at least 1 in. above the shingles and never caulk that gap; it must remain open to drain. Where horizontal trim or belly bands are used, install Z-flashing that laps behind the weather-resistive barrier and over the trim to shed water.
Ground and hard-surface clearances need maintenance over time. After exterior home remodeling, re-check that mulch, soil, or snow piles haven’t crept within the 6-in. zone. Ensure grade slopes away from the foundation so splash-back is minimized, and keep downspouts and gutters clean to prevent overflow onto lower walls. In snowy Wisconsin winters, avoid shoveling snow against the siding and clear ice dams promptly.
A professional siding contractor will install to spec and document details to preserve the LP warranty. Expert Exteriors coordinates siding and roofing flashings, sets correct clearances, and delivers durable siding installation tailored to Brookfield’s freeze-thaw climate. See their completed siding and exterior projects for examples of LP SmartSide done right and built to last.
Use Manufacturer-Approved Fasteners for Lasting Structural Integrity
Choosing the right fasteners is non-negotiable for LP SmartSide siding installation. LP’s engineered wood siding is designed to perform under stress, but only when it’s anchored with manufacturer-approved nails or screws that resist corrosion and provide strong withdrawal strength. Using the wrong fastener type—or installing the right fastener the wrong way—is one of the fastest paths to cupping, loosening, moisture intrusion, and denied claims under siding warranty requirements.
Select corrosion-resistant, full-round-head siding nails. Hot-dip galvanized fasteners that meet ASTM A153 are the norm; upgrade to Type 304/316 stainless steel in high-moisture or corrosive environments, near masonry splash zones, or where de-icing salts are common. Ring-shank nails typically offer better hold than smooth shank. Size the fastener to penetrate the wall studs the minimum depth specified by LP (commonly 1-1/2 in., depending on product and wall assembly), and set heads snug and flush—never proud or overdriven.
Essential fastening practices to follow:
- Drive nails into framing members, not just sheathing; verify stud layout and mark stud centers before hanging courses.
- Place nails at the designated nailing line for lap products or per panel edge/field patterns in LP’s current instructions; add face nailing only where LP or local wind design requires it.
- Calibrate your nailer’s depth-of-drive on a test piece; overdriven heads damage the overlay and invite moisture. If a fastener is overdriven, follow LP’s repair guidance immediately.
- Skip electro-galvanized nails and staples; they’re not approved and can void coverage.
- If screws are specified (e.g., for steel framing), use corrosion-resistant, bugle-head wood screws that meet LP requirements—don’t substitute drywall screws.
Common mistakes to avoid include nailing too close to edges, mixing dissimilar metals that can cause galvanic corrosion with aluminum trim, and fastening through foam without solid backing. When installing near pressure-treated framing or flashing, stainless fasteners are a safer choice to prevent chemical corrosion and keep a durable siding installation intact season after season.
A professional siding contractor will document fastener types, patterns, and substrate conditions to protect your warranty. In Brookfield, Expert Exteriors adheres to LP’s latest guidelines, coordinates trim details, and integrates water management at transitions, including professional gutters and fascia installation, so your exterior home remodeling performs as a complete system.
Implement Precision Flashing to Prevent Hidden Water Damage
Flashing is the unsung hero of LP SmartSide siding installation. Because engineered wood siding relies on a dry substrate to perform, even a small lapse in water management can cause swelling, paint failure, or substrate deterioration—and jeopardize siding warranty requirements. Precision flashing creates a continuous drainage and drying path so the system sheds water rather than trapping it behind cladding.
Start with shingle-style layering at every opening. Install a sloped sill pan or formed flashing first, then self-adhered jamb flashings that lap over the sill, and finally a head flashing (drip cap) that tucks behind the WRB above while extending over the window/door trim below. Use high-quality butyl-based tapes compatible with your WRB, roll them firmly, and form end dams at head flashings so water can’t run off the ends into the wall.
At roof-to-wall intersections, integrate step flashing with the WRB and add a properly sized kickout flashing where the roof terminates at the wall to direct water into the gutter. Ensure required clearances between siding and roofing per LP details to prevent capillary wicking. Missing or undersized kickouts are a common source of hidden rot behind cladding; in inspections, telltale signs include staining on the wall below the eave and softened sheathing at the bottom courses.
Use corrosion-resistant Z-flashing wherever siding meets horizontal trim, band boards, or ledger transitions. Flashing should be sloped to the exterior with a drip edge, extend past trim ends, and integrate with the WRB above. Maintain the manufacturer-required gaps between siding and flashing to promote drainage; don’t seal the weep edge. Sealants, where specified, belong at protected, upper laps—not across drainage paths.
Avoid these frequent flashing mistakes that undermine durable siding installation:
- Reverse-lapping WRB, tapes, or metals so water drains behind layers
- Nailing through head flashings or overdriving fasteners that deform metal
- Using tapes that are incompatible with the WRB or that lose adhesion in cold
- Omitting end dams or kickout flashing at roof-wall transitions
- Caulking shut weep edges or required drainage gaps
If you’re unsure about details, a professional siding contractor can verify local code and LP specifications, document work for warranty, and ensure long-term performance. In Brookfield and nearby communities, Expert Exteriors pairs precise flashing practices with LP-approved details—an advantage when your goal is reliable performance and maximum warranty coverage. Consult their local siding installation experts for projects that demand meticulous water management.
Follow Strict Expansion Joint Spacing for Seasonal Temperature Changes
Seasonal swings in Wisconsin can be tough on exterior cladding, which is why disciplined expansion joint spacing is non-negotiable for LP SmartSide siding installation. Engineered wood siding will move with temperature and moisture changes; forcing boards tight to trim, at butt joints, or around penetrations invites buckling, edge crush, and premature paint failure. LP’s installation manual and ESR dictate the required gaps and detailing—following them is a core siding warranty requirement and a key to long-term performance.
Focus on the areas where movement concentrates. At butt joints, install corrosion-resistant joint flashing and keep joints centered over studs; never “picture-frame” tight joints with caulk to make them disappear. At vertical trim, windows, and doors, maintain the manufacturer-specified clearance and use high-quality, flexible sealant with backer rod where required so the joint can expand and contract without tearing. Around penetrations and at inside/outside corners, integrate flashing with the WRB so water can escape even when materials move.
Practical checks to keep spacing precise and durable:
- Acclimate siding per LP’s guidance when conditions allow, and verify ambient temperature before setting gaps.
- Use dedicated spacers or story sticks to maintain consistent joint spacing across elevations.
- Stagger butt joints, keep them off high-splash zones when possible, and always back them with joint flashing.
- Prime/paint all field-cut edges and ends; sealant should meet ASTM C920 and be compatible with painted engineered wood siding.
- Set fasteners per LP’s pattern and distance from ends; avoid overdriven nails that crush fibers at joint edges.
- Maintain required clearances from grade, roofing, masonry, and hardscapes to prevent wicking and allow movement.
Consider a common scenario: installing lap siding in January at sub-freezing temps with tight joints may look crisp on day one, but when July heat hits, boards expand and can telegraph waves, pop paint, or split edges. Conversely, summer installs jammed tight against trim can reveal unsightly gaps in winter as boards contract. Properly sized expansion joints, flexible sealant, and joint flashing keep courses straight and the finish intact through these cycles.
If you want climate-specific detailing done right the first time, work with a professional siding contractor that builds to the letter of LP’s instructions. Expert Exteriors serves Brookfield and nearby communities with durable siding installation practices aligned with LP SmartSide’s siding warranty requirements, ensuring your exterior home remodeling investment performs season after season.
Seal All Cut Edges and Field Cuts to Validate Warranty
Every field cut in LP SmartSide siding installation exposes the engineered wood substrate. To meet LP’s siding warranty requirements and ensure durable siding installation, seal all cut edges—including end cuts, rips, drilled holes, and notches—before the board is fastened or immediately after cutting. Use a high-quality, exterior-grade, 100% acrylic latex paint or a manufacturer-approved touch-up system for factory-finished products. Apply in dry conditions and allow the coating to fully dry before the piece is installed against trim, flashing, or other materials.
Sealing isn’t just for obvious butt ends. Angle cuts on gables, ripped starter courses, soffit vent cutouts, penetration holes for lights or hose bibs, and window/door trim returns all expose raw fibers that can wick moisture. On prefinished LP SmartSide (such as ready-to-install color lines), use the designated touch-up paint and follow guidance on where full-board repainting is required versus localized touch-up. Avoid oil-based stains or incompatible sealants that can compromise adhesion.
Pay special attention at transition points where water is most likely to intrude. End cuts meeting trim should be sealed and then installed with proper clearances and flashing. Butt joints in lap siding should include back flashing; don’t substitute caulk for joint flashing. Maintain code- and manufacturer-compliant clearances—commonly at least 6 inches above grade, at least 1 inch above roofing, and above horizontal flashings—so sealed edges are not in constant contact with water or masonry.
Practical best practices to protect warranty coverage:
- Stage a touch-up kit at the saw table so every cut is sealed immediately.
- Wipe dust off cut edges before coating; apply a continuous film to fully cover the substrate.
- Seal fastener penetrations at trim and accessories where specified, and use paintable sealant compatible with acrylic coatings.
- Photograph representative cuts and keep product/lot numbers to document compliance for any future warranty claim.
As a professional siding contractor serving Brookfield and nearby communities, Expert Exteriors follows LP’s published installation details for engineered wood siding, documents critical steps, and verifies all field cuts are sealed before panel or lap boards are set. That diligence protects your investment, maintains manufacturer warranty eligibility, and delivers a clean, long-lasting exterior home remodeling outcome.