
How to Prepare Your Property for a New Roof: Our Expert Checklist
Why Proper Preparation Ensures Your Roof Investment Succeeds
A new roof is one of the most significant investments you’ll make in your home or commercial property. Over the years, we’ve discovered that how you prepare your property before installation day directly impacts the quality of our work, the timeline, and ultimately your satisfaction with the final result. When property owners take the time to get their property roof-ready, we complete projects faster, encounter fewer surprises, and deliver the polished finish you deserve.
This guide walks you through everything we recommend to prepare your property for roof replacement, drawing on what we’ve learned from hundreds of successful installations across Brookfield and surrounding Wisconsin communities.
Preparation isn’t just a courtesy—it’s the foundation of a successful roof replacement. When we arrive to begin work, every minute counts. Debris scattered across your roof, obstacles blocking access, or unclear expectations about the project timeline can create delays that push back your completion date by days.
Beyond efficiency, preparation protects your property during the work. Loose outdoor items can be damaged or lost. Garden beds near your home may get disturbed. Pets and family members need safe spaces away from active construction zones. When you’ve prepared thoughtfully, we can focus entirely on delivering excellent craftsmanship rather than navigating unexpected challenges.
We’ve also found that property owners who document their existing roof condition beforehand feel more confident about what we’re removing and why. You’ll have a clear visual record of the condition that justified the replacement, which matters for insurance claims and resale documentation.
The checklist below represents our collective experience installing roofs in all seasons and conditions. Following it typically reduces project friction and helps us maintain our tight installation schedules.
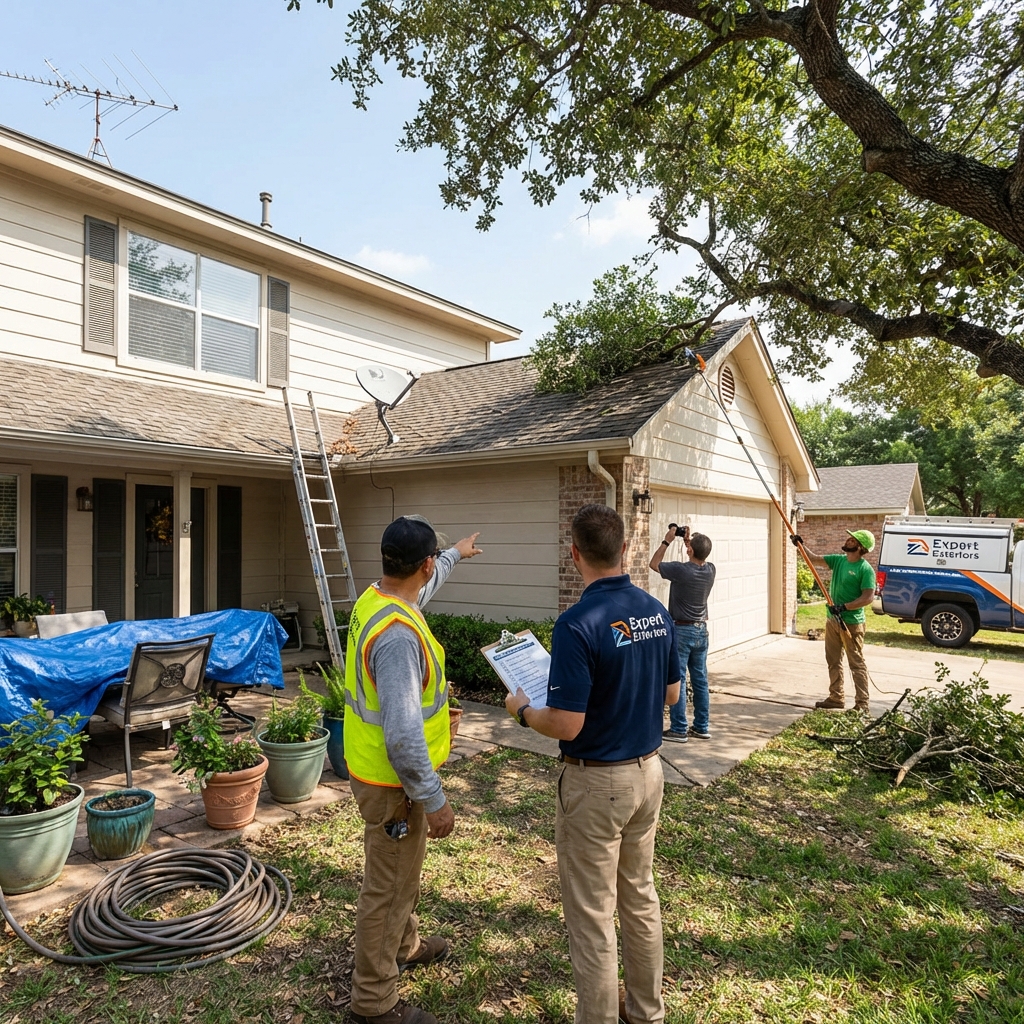
Clear Your Roof and Surrounding Areas
Your roof needs to be completely clear before we arrive. Remove any satellite dishes, antennas, roof vents that you’re having replaced anyway, or other personal items. If you have a rooftop HVAC unit or other equipment, confirm with us beforehand whether we’ll be removing and reinstalling it or working around it.
The ground around your home should also be cleared of vehicles, lawn furniture, grills, potted plants, and anything else that could be damaged by falling debris or in the way of our dumpster placement. We use safety nets and tarps to minimize debris scatter, but small pieces still fall beyond the perimeter.
Check your attic access points and remove any boxes, storage items, or clutter blocking entry. In some cases, we need interior access to properly install ventilation or address flashings. A clear path prevents delays.
For properties with mature landscaping close to the house, clear branches hanging directly above the roof line. We’ll address what we can from ground level, but your preparation here means we won’t get snagged or slowed down.
Action item: Walk your property with a critical eye two weeks before installation. Take photos of anything that might be in the way, then relocate or remove it. If you have roof-mounted equipment you’re uncertain about, call us for clarity.
Trim Trees and Remove Obstacles Near Your Home
Trees add beauty to your property, but overgrown branches directly above your roof create hazards during installation and ongoing maintenance. We’ll carefully work around trees as part of our process, but significant trimming is your responsibility beforehand.
Focus on branches within five feet of your roof line. Trim them back to create a clear buffer zone. This prevents branches from interfering with our equipment, protects your trees from accidental damage, and improves long-term roof health by reducing debris accumulation, algae growth, and moisture retention on the new surface.
If you have evergreen trees very close to your roofline, the same principle applies. We can work around them, but clearing space speeds up our crew and reduces risk during the installation.
Beyond trees, consider any patio covers, pergolas, or other structures within your driveway or immediate work zone. We need clear space for our truck, dumpster, and material staging. If these structures are removable or collapsible, it’s worth repositioning them for the project duration.
Action item: Hire a certified arborist or tree service if significant trimming is needed. Plan this 2-3 weeks before your installation date to give the property time to settle and clear. Minor trimming you can handle with a handsaw or pole saw if you’re comfortable.
Document Your Current Roof Condition With Photos
Before our crew arrives, photograph your existing roof from multiple angles. Climb a ladder and document shingles, flashing, gutters, and any visible damage, discoloration, or wear. Take wide shots from ground level too, capturing the overall condition of all sides of the roof.
These photos serve several purposes. If you have homeowners insurance and are filing a claim for the replacement, documented damage strengthens your case. If you’re selling your property, before-and-after photos provide transparency to buyers. For your own records, they show why the investment was necessary and provide comparison material when evaluating the new roof’s condition a few years from now.
Close-up photos of gutters, soffits, and fascia are especially valuable. We often discover during installation that water damage extends further than visible from ground level. Having documented the existing condition means you’ll understand exactly what we found and why additional repairs may be needed.
You can share these photos with us before installation, or we can document the existing condition as part of our pre-installation walkthrough. Either way, this record proves invaluable.
Action item: Use your smartphone to take at least 5-7 clear, well-lit photos from different vantage points. If you can access a ladder safely, get close-up shots of damaged areas. Store these in a folder with your project paperwork.
Protect Your Belongings and Secure Outdoor Items
Roof replacement generates noise, vibration, and dust. Your home’s interior will settle as the old roof comes off and the new one goes on. Loose items can shift, fall, or break. Interior preparation matters just as much as exterior clearing.
Start by securing anything valuable or sentimental in a safe, central location away from exterior walls. Vibrations from our equipment can rattle items on high shelves or dressers. Move breakables to interior closets or cabinets if possible.
For outdoor items, anchoring is your best defense. Secure outdoor furniture, grills, and planters so they don’t tip or blow over during weather changes throughout the project. Anything you want to protect from dust and debris should be moved inside or covered with tarps.
Check air conditioning units, heat pumps, and other ground-level equipment. These may vibrate during roof work. Confirm they’re operating normally before we arrive. If your AC unit sits near the work zone, we’ll be mindful, but secure any loose components or covers beforehand.
Pet safety deserves specific attention. Create a quiet, comfortable interior space away from windows and external walls where pets can stay during the loudest parts of the day. Let us know on your project paperwork if you have pets, as this helps our team adjust their approach and timing to minimize stress.
Action item: Three days before installation, do a full property walk-through. Secure outdoor items, move breakables, and prep a comfortable pet zone if needed. Leave a list of special instructions at your front door for our crew.
Communicate Access Points and Project Timeline
Clear communication about access to your property prevents confusion on installation day and keeps our crew on schedule. Decide in advance which entrance we’ll use most frequently and ensure it’s unlocked and unobstructed. If we need multiple entry points (front, back, garage), identify those now.

Discuss parking arrangements with us. Our truck and dumpster need flat, stable ground. Ideally, we park in your driveway or on the street immediately adjacent to the work area. If parking is limited or unusual (narrow driveway, sloped ground, limited street access), let us know when scheduling so we can plan accordingly.
Talk through the daily timeline. Most residential roof replacements take 1-3 days depending on size and scope. We typically start early morning and work until late afternoon. Confirm whether you’ll be home or away, and establish a communication plan in case issues arise or we need to reach you. A contact number on your project paperwork ensures we can always connect.
If you have a commercial property, clarify business operations during the project. Will you remain open? Do we need to coordinate with specific staff? Are there delivery schedules, client visits, or operational requirements we should know about? This discussion prevents surprises and allows us to coordinate our timing with your business needs.
For multi-day projects, confirm whether we need any water access for our crew (hydration station during hot weather is appreciated). Let us know about any neighborhood noise restrictions or community guidelines we should respect.
Action item: Schedule a brief call with us one week before installation to confirm access points, parking, timeline, and any special circumstances. This 10-minute conversation eliminates 90% of day-one friction.
Our Pre-Installation Walkthrough Process
Before we begin any work, we conduct a thorough walkthrough of your property with you present, if possible. This inspection confirms measurements, establishes material staging areas, identifies any unexpected conditions, and clarifies exactly what we’re doing and what you can expect.
During this walkthrough, we photograph the existing roof, inspect flashing and gutters, check for any hidden damage visible from inside the attic, and confirm the scope of work matches our initial estimate. If we discover something that changes the project (water damage requiring additional framing repair, for example), we discuss it with you immediately and provide updated pricing before any work begins.
We also walk the ground-level perimeter together. We show you where our dumpster will sit, where materials will be staged, which areas of your lawn might have equipment traffic, and how we’ll protect your landscaping and nearby structures. You see exactly how we’re organizing the work, which reduces anxiety about disruption.
If you have questions about materials, installation methods, warranty coverage, or the timeline, this walkthrough is the perfect moment to ask. We explain our process, answer your concerns, and make sure you feel confident about the project moving forward.
For commercial properties, this might include a meeting with facility managers or business owners to coordinate scheduling, access protocols, and operational adjustments needed during installation.
Action item: Plan to spend 30-45 minutes on the walkthrough. Take notes on anything discussed, ask for clarification on any point you’re unsure about, and confirm you’ve received a written project schedule before we leave.
What to Expect During Your Roof Replacement
Roof replacement follows a logical sequence, and knowing what happens each day helps you prepare mentally and logistically. Here’s how we typically structure the work:
Day One: Tearoff and Inspection
We start by removing the existing roof completely. This is the noisiest and dustiest part of the process. Our crew works systematically from ridge to eave, removing shingles, nails, and underlayment. As the old roof comes off, we expose the deck (the wooden layer underneath) and inspect for damage.
If we find structural issues (rotted decking, compromised joists), we’ll contact you immediately with photos and a price for the repair work needed. Most of the time, we can proceed with replacement, but occasionally we discover something that requires attention before new material goes down.

Once the deck is exposed and inspected, we apply new underlayment and begin installing flashing around chimneys, vents, valleys, and eaves. This foundational layer is critical for water protection, even though you won’t see it under the new shingles.
Day Two: New Roof Installation
We install the new roofing material systematically, starting at the eaves and working toward the ridge. Every shingle is nailed according to manufacturer specifications, and all flashing is sealed and secured. For commercial properties using TPO or EPDM systems, the process differs slightly, but the principle remains the same: meticulous installation following strict industry standards.
We’re also installing new gutters and fascia if those are part of your project. These components tie directly into your roofline and need to be properly secured and sealed to function correctly.
Day Three (if applicable): Final Details
We remove temporary protection, clean up all debris, inspect the completed roof thoroughly, and walk you through the finished product. We point out key features, explain your warranty coverage, and ensure you know how to maintain your investment long-term.
Throughout all three days, we’ll manage dust by using tarps and carefully controlling debris. We clean up daily so your property doesn’t feel like an active construction zone when you return home each evening.
Action item: Plan to be accessible by phone during the first day. If we discover anything that requires your approval or decision, we need to reach you promptly.
How Expert Exteriors Makes Installation Day Seamless
Our approach to installation day is built on preparation, communication, and quality craftsmanship. We’ve been serving Brookfield and surrounding communities for years, and our reputation depends on making every project as smooth as possible for our clients.
We arrive early to set up properly. Our crew establishes work zones, positions equipment safely, and establishes daily routines that minimize disruption to your neighborhood. We’re respectful of your neighbors too, keeping noise levels as reasonable as possible during early hours and wrapping up at a reasonable time each day.
Our crew is trained to work efficiently without sacrificing quality. Every nail is driven to precise specification. Every flashing joint is sealed to manufacturer standards. Every detail receives the same attention to excellence, whether it’s visible from ground level or hidden under the final layer.
We provide transparency throughout the work. If we discover anything unexpected, we contact you immediately with photos, explain the issue, and discuss solutions. We don’t surprise you with additional charges at the end of the project. If something comes up that’s outside your original scope, we discuss it, agree on pricing, and document it before proceeding.
Communication extends to your neighborhood too. We respect parking regulations, maintain cleanliness, and keep noise to reasonable hours. We understand that roof replacement affects not just your property but the surrounding area, and we conduct ourselves as good neighbors.
When we’re finished, we walk the completed roof with you, explain your warranty coverage, and provide you with all necessary documentation. Our 15-year workmanship warranties give you confidence that we stand behind our work. We’re available for questions, maintenance guidance, and any follow-up service you might need.
For property owners across our service area, we offer the same commitment to quality and customer care. Whether you need a residential roof replacement or commercial roofing solutions using EPDM or TPO systems, our approach remains consistent: thorough preparation, transparent communication, and installation excellence.
Action item: Before your installation date arrives, review this checklist one final time. Check off each item as you complete it. This ensures nothing falls through the cracks and positions you and our team for a successful project from start to finish.
If you’re ready to move forward with a new roof, we’re here to help. Get your instant roof quote today, or explore our full range of exterior solutions, including siding, gutters, fascia, and soffit replacements. Our team looks forward to protecting and enhancing your property with quality craftsmanship you can trust.