
How Proper Roof Ventilation and Insulation Extend Your Roof’s Lifespan
Why Most Property Owners Overlook Ventilation and Insulation Issues
Your roof is your home’s first line of defense against Wisconsin’s harsh weather. But here’s what most property owners don’t realize: the shingles themselves are only half the story. What happens beneath them, in your attic space, determines whether your roof lasts 15 years or 25 years. Proper roof ventilation and insulation are the invisible guardians that keep moisture at bay, regulate temperature, and protect your investment from the inside out.
At Expert Exteriors, we’ve seen firsthand how attic ventilation and insulation upgrades transform roof longevity. When these systems work together correctly, they reduce premature deterioration, lower energy costs, and prevent costly interior damage. If your roof shows signs of aging or you’ve noticed higher heating bills, the problem might not be the shingles at all.
Ventilation and insulation live out of sight, so they’re easy to forget. When you look at your roof, you see shingles. When you think about roof replacement, you picture new materials and installation. But the attic above your head rarely crosses your mind unless something goes visibly wrong.
This blind spot costs us dearly. Most property owners assume that as long as shingles look intact, the roof is healthy. In reality, moisture can be silently accumulating in the attic space, trapped heat can be cooking the underside of the roofing system, and inadequate insulation can be driving energy waste year-round. By the time you notice sagging spots or water stains, significant damage has already occurred.
The technical side adds another layer of confusion. Ventilation needs differ based on climate, attic configuration, and existing insulation levels. There’s no one-size-fits-all formula, so property owners often avoid the topic entirely rather than navigate conflicting advice from contractors or online forums.
Our recommendation: schedule a professional attic inspection now, before problems surface. Early detection of ventilation gaps or insulation degradation saves tens of thousands in repairs later.
The Real Cost of Poor Roof Ventilation and Inadequate Insulation
Poor ventilation and weak insulation hit your wallet three ways: accelerated roof deterioration, sky-high energy bills, and moisture-related structural damage.
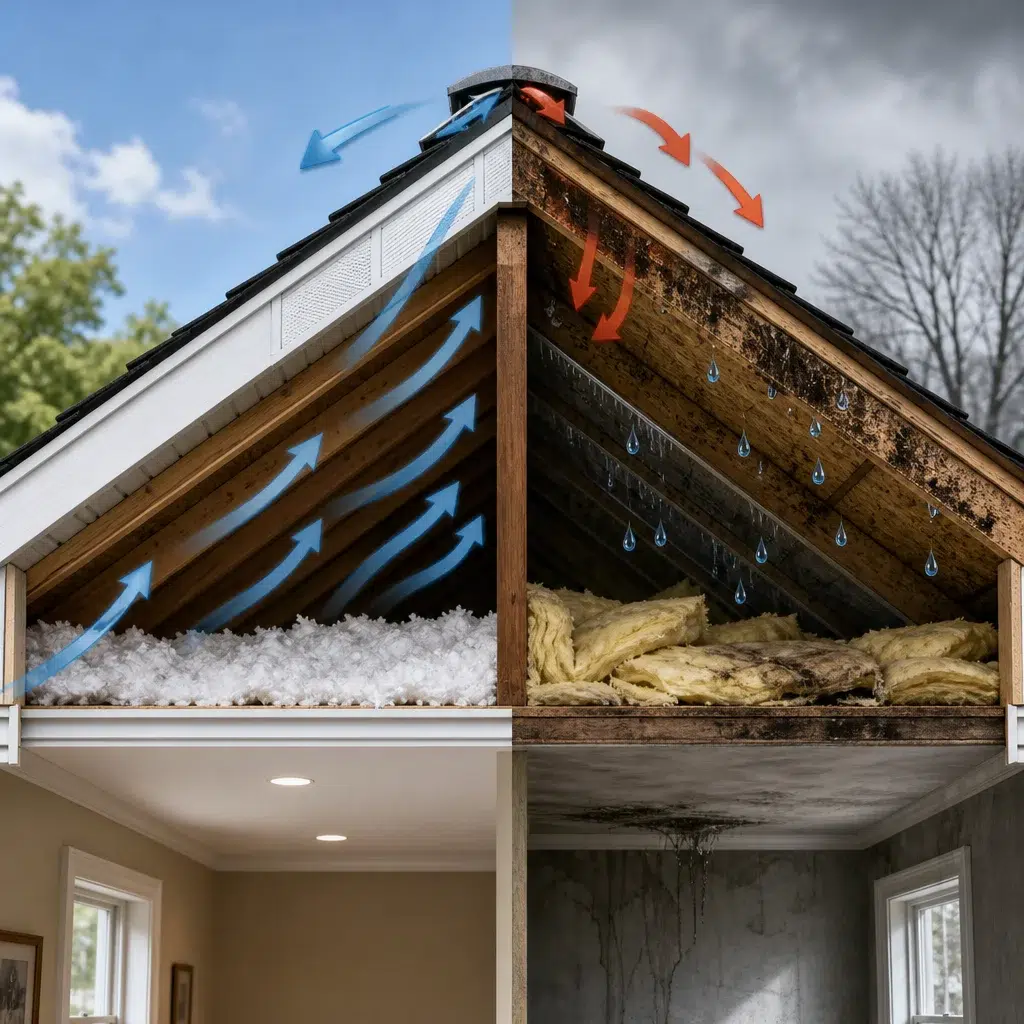
When your attic lacks proper airflow, heat and moisture become trapped. In summer, temperatures can exceed 150 degrees under the roof deck. This extreme heat breaks down shingles and roofing felt prematurely, turning a 25-year roof into a 15-year liability. In winter, warm air rising from living spaces meets cold exterior air, creating condensation that freezes and thaws repeatedly, weakening the roof assembly.
Energy costs compound the problem. Inadequate insulation means heated or cooled air escapes through the roof instead of staying inside your home. We’ve reviewed utility bills for property owners who were spending 20-30% more on heating and cooling than necessary. That monthly premium adds up quickly. Over a decade, subpar insulation can cost $5,000 to $15,000 in excess energy spend alone.
But the biggest threat is hidden structural damage. Moisture buildup in the attic doesn’t just affect the roof deck. It can seep into wall cavities, compromise rafter integrity, promote mold growth, and create pest entry points. Insurance often won’t cover this damage if it’s deemed negligence related to poor maintenance. Repair costs for water damage, mold remediation, and structural reinforcement frequently exceed $10,000 to $25,000 depending on severity.
The math is straightforward: investing $2,000 to $4,000 in proper ventilation and insulation now prevents $15,000 to $50,000 in damage later.
How Moisture Buildup Damages Your Roof From the Inside Out
Moisture is the silent destroyer of roofing systems. Unlike external damage from storms or hail, moisture damage happens gradually and invisibly, making it particularly dangerous.
Here’s the moisture cycle in an under-ventilated attic: warm, humid air from bathrooms, kitchens, and laundry areas rises into the attic. Without adequate ventilation, this moisture has nowhere to escape. It condenses on cold surfaces, particularly on the underside of the roof sheathing and on poorly insulated sections. This condensation saturates the plywood deck, which was never designed to stay wet.
Once the roof deck absorbs moisture, rot begins. Wet wood loses structural strength and becomes fragile. Mold spores thrive in damp environments, creating both health hazards and further material degradation. Nails that once held shingles firmly start to corrode and loosen. The entire roofing system becomes compromised from beneath.
In Wisconsin winters, the problem escalates. Moisture freezes in the wood, expanding as it turns to ice. This freeze-thaw cycle creates stress cracks and can literally split roof sheathing. When spring arrives and ice melts, water seeps into attic insulation, dripping into wall cavities below. By summer, mold colonies have established themselves throughout the structure.
Inadequate insulation exacerbates this because heat loss means more warm air rising into the attic, carrying moisture along with it. Homes with both poor insulation and poor ventilation experience the worst outcomes.
The path forward requires two parallel improvements: ventilation that removes moist air before it condenses, and insulation that minimizes warm air rising into the attic in the first place.
Our Comprehensive Ventilation Assessment Process
We don’t guess when it comes to ventilation. Our assessment process is systematic and thorough, examining every factor that affects how air moves through your attic.
We start with a detailed attic inspection. Our team looks for existing vents, evaluates their condition and placement, checks for blockages like insulation pushed against soffit vents, and measures current ventilation coverage. We also photograph problem areas and note any signs of moisture damage, mold, or wood deterioration.
Next, we calculate your home’s ventilation needs based on attic square footage. Building code requires at least 1 square foot of ventilation for every 150 square feet of attic space (when ventilation is balanced between intake and exhaust). We verify whether your current system meets this requirement.
We then assess your specific moisture sources. Does your bathroom exhaust vent into the attic instead of outside? Are there dryer vents discharging warm, moist air internally? Are kitchen range hoods properly ducted? We identify and document every source of moisture being introduced into the attic space.
Our evaluation also considers air sealing. If your attic isn’t properly air-sealed at the ceiling plane, conditioned air continues leaking into attic space regardless of how much ventilation you add. We identify air leaks around can lights, electrical penetrations, plumbing vents, and chimney chases.
Based on these findings, we recommend specific improvements: additional soffit vents for intake, ridge vents or turbine vents for exhaust, proper ducting of moisture-producing appliances, attic insulation improvements, and air sealing measures. Our assessment report gives you a clear roadmap.
We recommend scheduling this assessment every 5-7 years, or immediately if you’ve noticed higher heating bills, visible mold, water stains, or roof damage patterns.
Strategic Insulation Upgrades We Recommend for Maximum Protection
Insulation quality and depth directly impact roof ventilation effectiveness. We evaluate your current insulation and recommend upgrades that work hand-in-hand with ventilation improvements.
Most homes built before 2000 have inadequate insulation by modern standards. Common scenarios include attics with only 3-4 inches of fiberglass batts when current best practice calls for 10-14 inches (R-30 to R-49 depending on Wisconsin climate zone). Older insulation also degrades over time, losing its thermal resistance.
We recommend blown-in fiberglass or cellulose insulation for most applications because it conforms to irregular attic spaces and rafters, eliminating thermal bridging that batts miss. Cellulose offers slightly better thermal performance and moisture buffering, while fiberglass is cost-effective and non-flammable. Both require proper air sealing before installation to be effective.
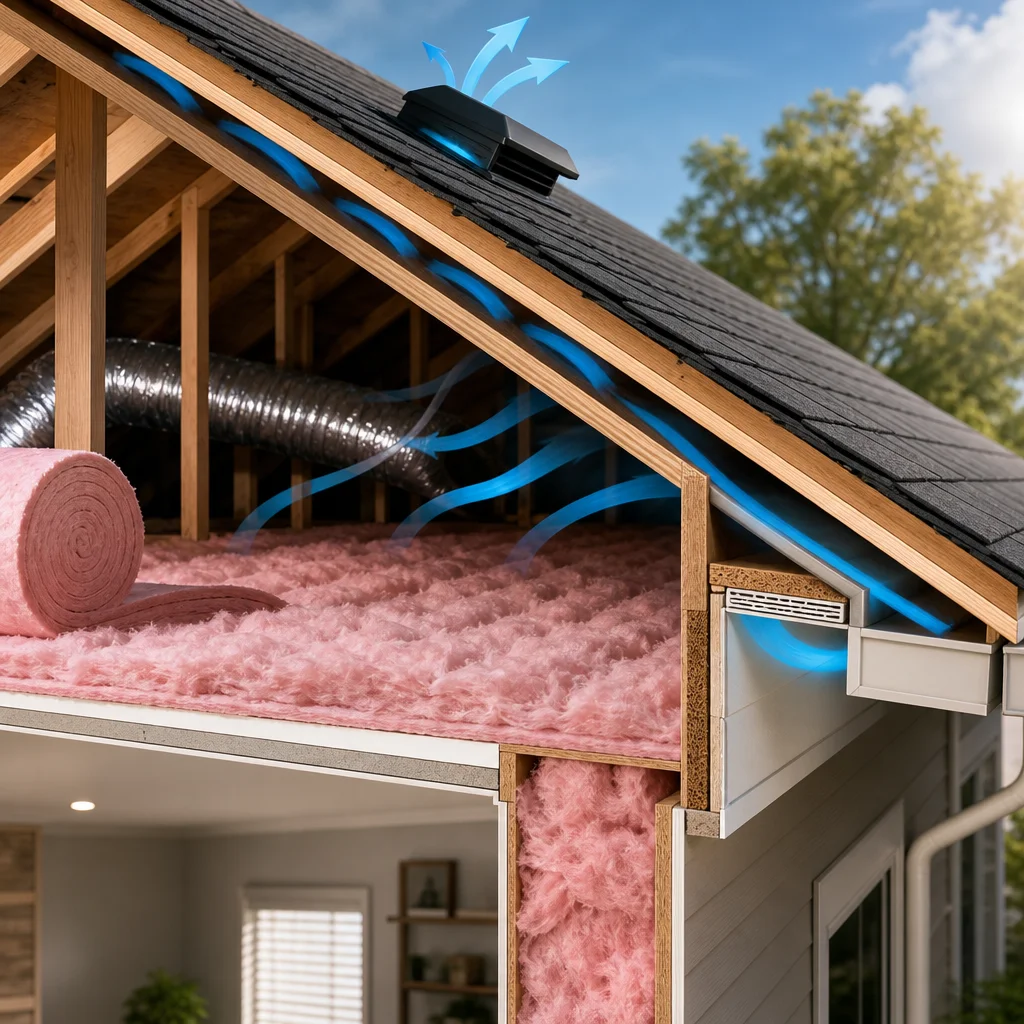
The installation approach matters tremendously. Insulation must never block ventilation pathways. We install insulation baffles in every rafter bay to maintain the air gap between the roof sheathing and insulation surface. Without these baffles, insulation blocks soffit vent intake airflow, defeating the entire ventilation strategy.
We also evaluate uninsulated or poorly insulated sections. Common weak spots include the band joist area where walls meet the attic floor, short rafter spaces near the roof edge, and areas around roof penetrations like plumbing vents or exhaust fans. These spots are thermal and moisture hotspots that deserve targeted upgrades.
For commercial properties, we assess spray foam versus traditional batts or blown-in applications. Spray foam can provide better air sealing in complex attic configurations, though cost is typically 3-4x higher than traditional insulation.
Our insulation upgrade typically costs $1,500 to $3,500 for residential properties, depending on attic size and current conditions. When combined with ventilation improvements, total investment ranges from $2,500 to $5,000, but extends roof life by 7-10 years and reduces energy costs immediately.
The Connection Between Ventilation, Insulation, and Energy Efficiency
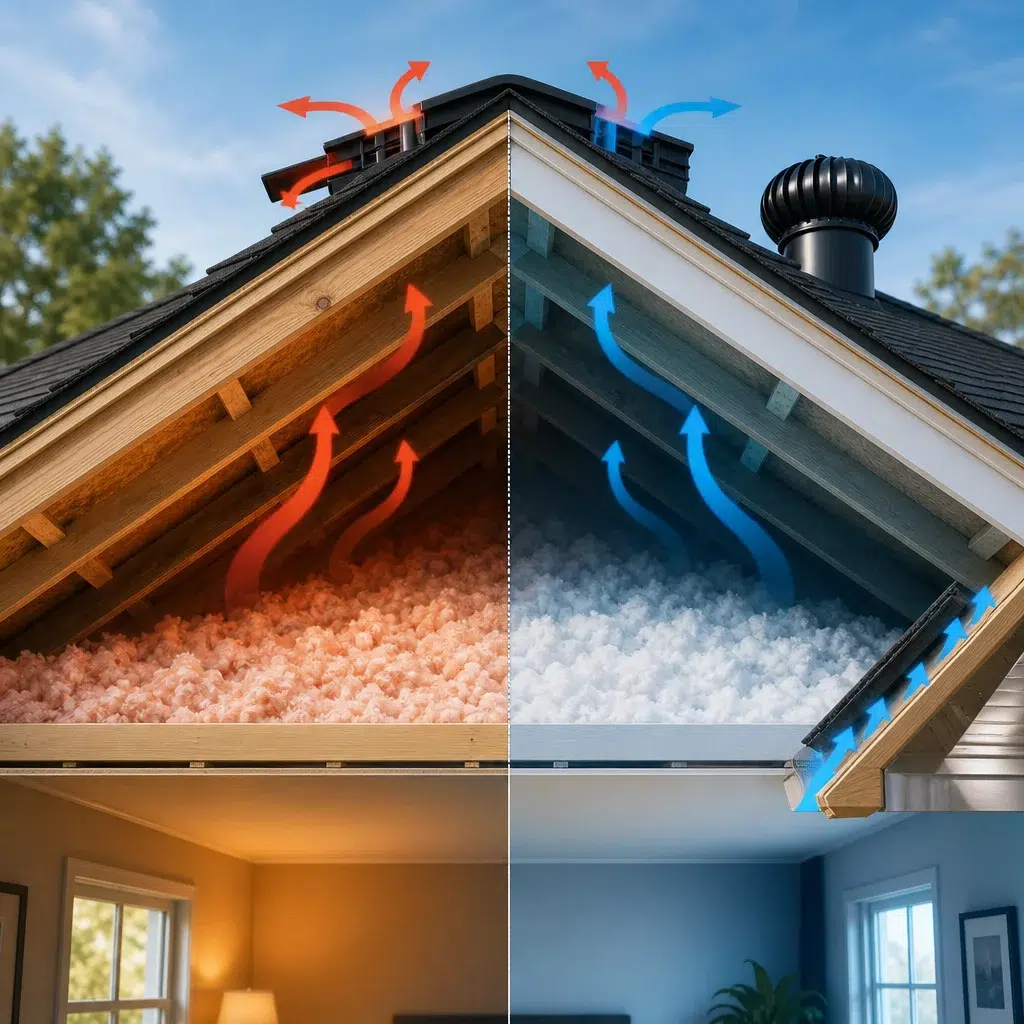
You might assume that ventilation and insulation work against each other. Good ventilation sounds like you’re removing conditioned air, right? Actually, when these systems are properly balanced, they work synergistically to improve energy efficiency and comfort.
Here’s why: proper ventilation removes excess moisture and heat from the attic before these conditions damage your roof. Without ventilation, extra insulation alone would trap heat and moisture, creating a pressure cooker effect. With ventilation, that same extra insulation keeps conditioned air in your living spaces where it belongs, while outside air in the attic space flows through and exits continuously.
The result is dramatic. Better insulation reduces the heat or cool air that escapes through your roof. Lower attic temperatures mean your air conditioning system doesn’t work as hard in summer, reducing cooling costs by 10-20%. Better insulation also means more consistent indoor temperatures, eliminating hot spots under roof eaves in winter.
We’ve documented this through client utility bills. Property owners who upgraded insulation to R-40 and improved ventilation simultaneously saw average winter heating reductions of 12-18% and summer cooling reductions of 15-22%. One residential client in Brookfield reduced their annual energy spend by $1,200 after we upgraded their attic to proper ventilation and R-49 insulation.
Beyond cost savings, improved ventilation and insulation enhance comfort. Fewer drafts, more consistent temperatures, and reduced ice damming in winter are tangible benefits. You’ll also notice improved indoor air quality because proper ventilation prevents moisture and mold issues that otherwise compromise air quality.
For a deeper dive into how exterior upgrades boost efficiency, see our guide on energy efficiency for roofs.
Our Installation Process for Ventilation and Insulation Systems
Installation quality determines whether ventilation and insulation actually perform as designed. We follow a systematic process that handles both components together as an integrated system.
We begin with air sealing, the foundation of everything else. Our crew seals penetrations around electrical outlets, light fixtures, plumbing vents, chimney chases, and the attic access opening. We use caulk, weatherstripping, or foam blocks depending on the location. This prevents conditioned air from leaking into the attic and ensures ventilation removes only outdoor air, not your heated or cooled indoor air.
Next, we install insulation baffles in every rafter bay. These rigid baffles maintain a clear 1-2 inch air gap between the roof sheathing and insulation surface. Without baffles, insulation compresses and covers soffit vents, strangling ventilation intake. Installation takes patience and precision, but it’s non-negotiable for proper airflow.
We then apply insulation itself. For blown-in applications, we use calibrated equipment to achieve consistent R-value across the attic floor. Our crew measures depth progressively and documents final R-value achieved. For spray foam, we follow manufacturer specifications carefully, applying appropriate thickness while ensuring vapor permeability where required.
Ventilation installation follows. We may add soffit vents if intake is insufficient, install new ridge vents or powered exhaust fans if outlet capacity is limited, or upgrade existing vents to higher-capacity models. We ensure all vents are properly sealed at penetration points and supported to prevent settling or damage.
Finally, we inspect everything. We photograph work in progress, verify ventilation intake and exhaust alignment, confirm insulation R-value and coverage, and test airflow with visual indicators. We provide a completion report documenting all work performed and final system capacity.
The typical installation takes 2-4 days depending on attic size and complexity. We manage all materials, disposal of old insulation if needed, and cleanup. Your attic is left clean and ready for the improved performance ahead.
Real Results: How Our Clients Extended Their Roof’s Life
We’ve helped dozens of property owners in Brookfield and surrounding areas dramatically extend their roof’s useful life through proper ventilation and insulation. These aren’t theoretical improvements; these are real outcomes from systematic work.
A residential client in Brookfield noticed their roof was showing wear after just 12 years despite having high-quality asphalt shingles. During a roof inspection, we identified significant attic moisture issues and inadequate ventilation. Their attic had only 3 inches of insulation and virtually no intake vents. We upgraded to R-40 insulation, installed proper soffit and ridge ventilation, and air-sealed all penetrations. Within two years, they reported no new roof damage, their energy bills dropped by $120 per month, and their roof is now performing as it should for a 25-year shingle system.
Another commercial property owner with a flat roof in a neighboring community was experiencing recurring leaks traced back to condensation buildup beneath the roof membrane. Traditional roof repair attempts failed because they didn’t address the underlying ventilation problem. We installed a proper ventilation system designed for flat commercial roofs (including ridge vents positioned for continuous airflow). We also improved attic insulation and installed vapor barriers. The leaks stopped immediately, and the roof is now approaching year 10 without incident when previous systems had failed by year 4.
A family in suburban Milwaukee discovered mold in their attic during an unrelated inspection. Rather than just treating the mold, we addressed root causes: poor ventilation trapping moisture from their bathroom exhaust and inadequate insulation driving moisture-laden warm air into the attic. After ducting the exhaust outside, installing proper ventilation, and upgrading insulation, the mold didn’t return. Their utility costs also dropped 15%, turning a remediation expense into an efficiency investment that pays dividends.
These results reflect what happens when ventilation and insulation are treated as a system rather than separate improvements. Browse our residential roof replacement success stories for additional examples of transformations we’ve completed.
Why Professional Installation Matters More Than DIY Solutions
The appeal of DIY attic work is understandable. Insulation seems straightforward, and vents appear simple to install. But we’ve cleaned up more DIY mistakes than we can count, and the cost of fixing them always exceeds the cost of doing the work right initially.
Common DIY mistakes include: insulation compressed against soffit vents (blocking 80% of intake airflow), missing air sealing around electrical boxes (allowing conditioned air to escape into the attic), improper vent sizing for the attic’s actual ventilation needs, insufficient insulation coverage leaving thin spots, and vents installed without proper flashing (creating leak points that compromise roofing integrity).
We also frequently encounter DIY ventilation additions that look good but don’t actually work. A homeowner might install a ridge vent without removing the old roof cap or without properly connecting ridge vent components, resulting in a blocked vent that provides zero airflow. Or they might add soffit vents without removing old vents first, creating overlap that confuses airflow patterns.
The physics and building code requirements around ventilation aren’t intuitive. You need to balance intake and exhaust airflow, position vents to maximize natural convection, account for attic configuration and insulation type, and follow specific code requirements that vary by climate zone. Missing any of these creates systems that look installed but don’t function.
Professional installation also means warranty protection. When we install ventilation and insulation, we warranty our work. If performance issues arise, we return and fix them at no charge. DIY work has no safety net.
Finally, there’s the access and safety factor. Attics can be dangerous spaces with structural beams in unexpected places, sharp edges on ductwork, and limited visibility. Professional crews are trained and equipped to work safely in these conditions.
Our installation fee is reasonable compared to the cost of fixing DIY mistakes or tolerating a under-performing system for years. Budget $2,500 to $5,000 for a complete professional upgrade, compared to $800-1,200 in materials for DIY work that likely won’t perform correctly.
Your Next Steps Toward a Longer-Lasting Roof
If you’re experiencing higher energy bills, noticing roof damage sooner than expected, or simply want to protect your investment, the path forward is clear.
First, schedule a professional attic inspection with our team. We’ll assess your current ventilation and insulation, identify problem areas, and provide specific recommendations. This inspection typically takes 1-2 hours and costs $200-300, but the insights save you thousands in future mistakes.
Second, prioritize improvements based on our assessment. Most properties benefit from addressing ventilation first, since moisture problems intensify all other issues. Insulation upgrades come next, followed by targeted air sealing where needed.
Third, get a detailed proposal outlining scope, materials, timeline, and warranty. Ask questions about airflow calculations, insulation R-value, and how the work will be verified upon completion.
Finally, schedule installation during a window when weather permits and attic access is convenient. Most jobs complete within 2-4 days.
Your roof is worth protecting. Proper ventilation and insulation are the foundation that keeps expensive roofing materials performing as designed for their full lifespan. We’re here to guide you through the process and handle the work professionally.
Contact Expert Exteriors today to schedule your comprehensive attic assessment. Let’s build the ventilation and insulation system your roof deserves.
For further reading: Roof replacement prep tips.