
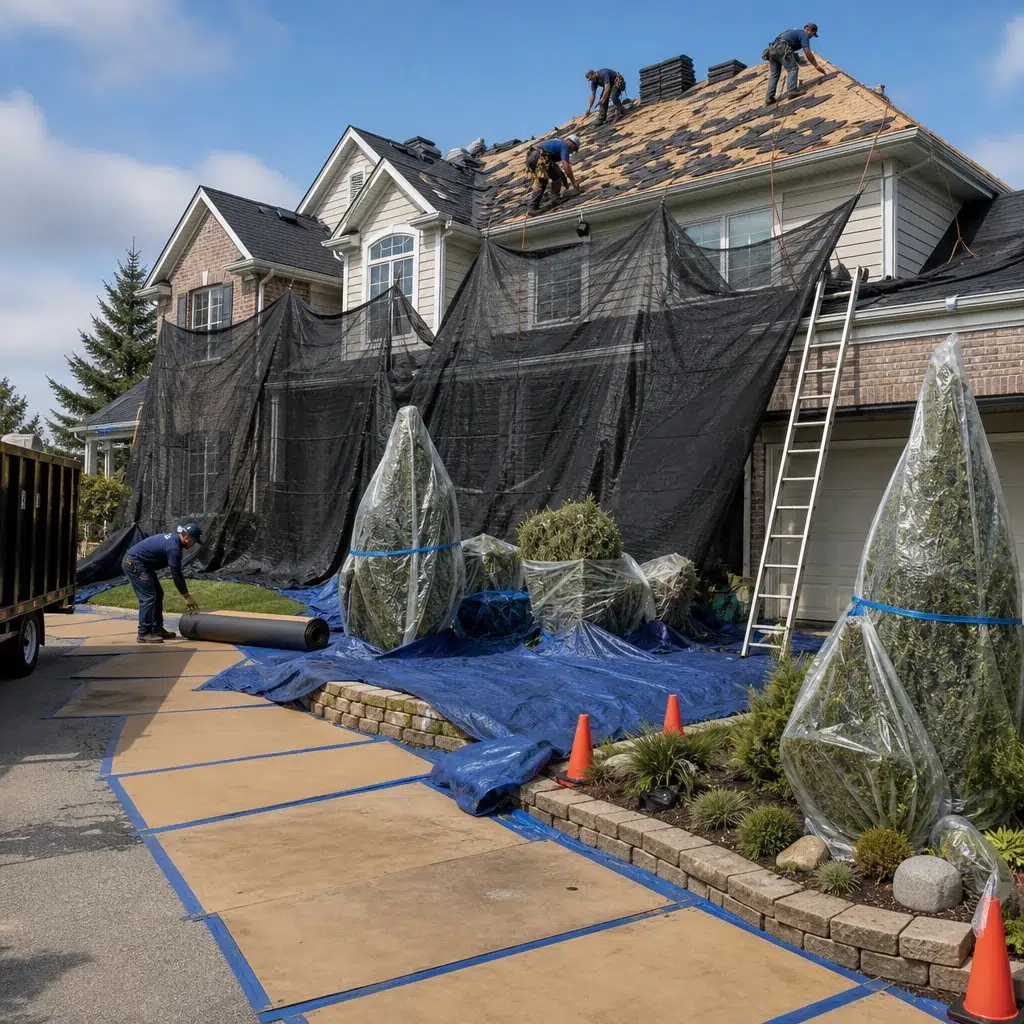
Top 7 Ways We Protect Your Landscape and Driveway During Roof Installation
1. Understanding the Impact of Roof Installation on Your Property
Roof installations create multiple hazards that extend well beyond your roofline. Gravity works against you: shingles, nails, flashing, and debris cascade downward throughout the day. A two-story residential roof can shed hundreds of pounds of material. Commercial projects involving TPO or EPDM membranes add bulk and weight that multiplies the risk.
The ground-level impact includes:
- Driveway damage from dropped tools, falling metal, and foot traffic from crews carrying heavy loads
- Landscaping crushed by equipment placement and worker movement
- Garden beds buried under debris piles
- Foundation plantings stripped or damaged by falling materials and pressure washing runoff
- Mulch, gravel, and decorative stone scattered across adjacent areas
- Tree branches broken by ladder placement or falling debris
Beyond physical damage, improper material staging creates liability. Unsecured piles near property lines, drainage issues from diverted water, and chemical residue from roof cleaning solutions affect neighboring properties and your landscaping’s health.
We’ve seen property owners face repair bills exceeding the cost of the roof installation itself when debris protection wasn’t prioritized. Starting with a clear understanding of these risks allows us to deploy countermeasures that prevent problems rather than remediate them afterward.
Actionable takeaway: Before scheduling your roof replacement, walk your property’s perimeter and identify high-value landscaping, vehicles, and outdoor features that need explicit protection during work.
2. Pre-Installation Site Assessment and Planning
Our process begins with a comprehensive site walk, ideally completed two weeks before installation starts. This isn’t a quick visual inspection; it’s a detailed assessment that documents every element requiring protection and identifies staging constraints.
During this assessment, we evaluate:
- Proximity of mature trees, shrubs, and garden beds to work zones
- Current driveway condition and material (concrete, asphalt, pavers)
- Placement options for equipment, debris containers, and material staging
- Underground utilities, septic systems, and drainage patterns
- Existing damage or wear that could worsen under construction pressure
- Weather patterns and seasonal considerations
This planning phase reveals conflicts that sloppy contractors ignore. For example, we recently assessed a Brookfield property where the easiest equipment access ran directly over newly planted shrubs and a freshly sealed asphalt driveway. A contractor focused only on speed would have proceeded without hesitation. We repositioned staging to protect both features, requiring additional coordination but preventing thousands in remediation.
We also photograph your property before work begins. This baseline documentation protects both you and us by establishing what existed before installation started. If disputes arise about damage attribution, these photos provide objective proof of conditions.
The site assessment itself drives everything that follows. Without this planning, protection becomes reactive and incomplete.
Actionable takeaway: Request a pre-installation site assessment from your roofing contractor and ensure they provide a written plan documenting protection strategies for your specific property.
3. Strategic Debris Containment Systems We Deploy
Debris containment separates professional installations from rushed ones. We use multiple overlapping systems because no single solution captures everything falling from a multi-story roof.
Our primary containment approach combines:
- Ground-level catch systems: Heavy-duty tarps suspended on sturdy frames positioned around the home’s perimeter. These catch debris mid-flight before it reaches landscaping or driveways. Unlike simple tarps thrown on the ground, these elevated systems create an actual barrier between the roof and ground-level features.
- Debris containers: Roll-off dumpsters positioned to collect bulk material without overflow. We size containers based on your roof’s square footage and material type. A 1,200 square foot residential roof requires different containment than a 5,000 square foot commercial installation.
- Chute systems: For multi-story buildings or commercial projects, we deploy enclosed chutes that funnel debris directly into containers, preventing scatter and protecting workers below.
- Magnetic sweeps: After debris collection wraps, we use magnetic equipment to capture roofing nails and metal fragments that settle on driveways and adjacent surfaces. This prevents future flat tires and punctures.
The cost of robust containment systems represents a fraction of potential damage remediation. We’ve calculated that comprehensive debris containment adds roughly 3-5% to project costs but eliminates 85-95% of landscape and driveway damage typical with basic installations.
We also stage materials strategically. Rather than piling new roofing materials near the work zone where equipment must run over them repeatedly, we position staging areas in locations that minimize traffic patterns affecting your landscape.
Actionable takeaway: When requesting quotes for roof replacement, ask contractors specifically about their debris containment systems and request to see photos of previous installations showing containment setup.
4. Protective Barriers for Landscaping Features
Mature landscaping represents an investment that takes years to mature. We treat it accordingly by deploying multiple barrier types based on what we’re protecting.
For high-value features like specimen plantings, we use:
- Physical barrier fencing: Temporary fencing installed around vulnerable shrubs and garden beds creates a clear “do not enter” zone for crews. This psychological barrier proves surprisingly effective when combined with explicit crew briefing about protected areas.
- Plywood panels: For particularly delicate ornamental trees or expensive foundation plantings, we create protective structures using plywood sheets positioned to deflect falling debris while allowing light and moisture penetration.
- Burlap wrapping: Existing tree branches positioned over work zones receive protective wrapping that cushions impact without restricting growth.
- Mulch barriers: Before work begins, we extend protective mulch layers around vulnerable plantings, creating a sacrificial buffer that absorbs debris impact.
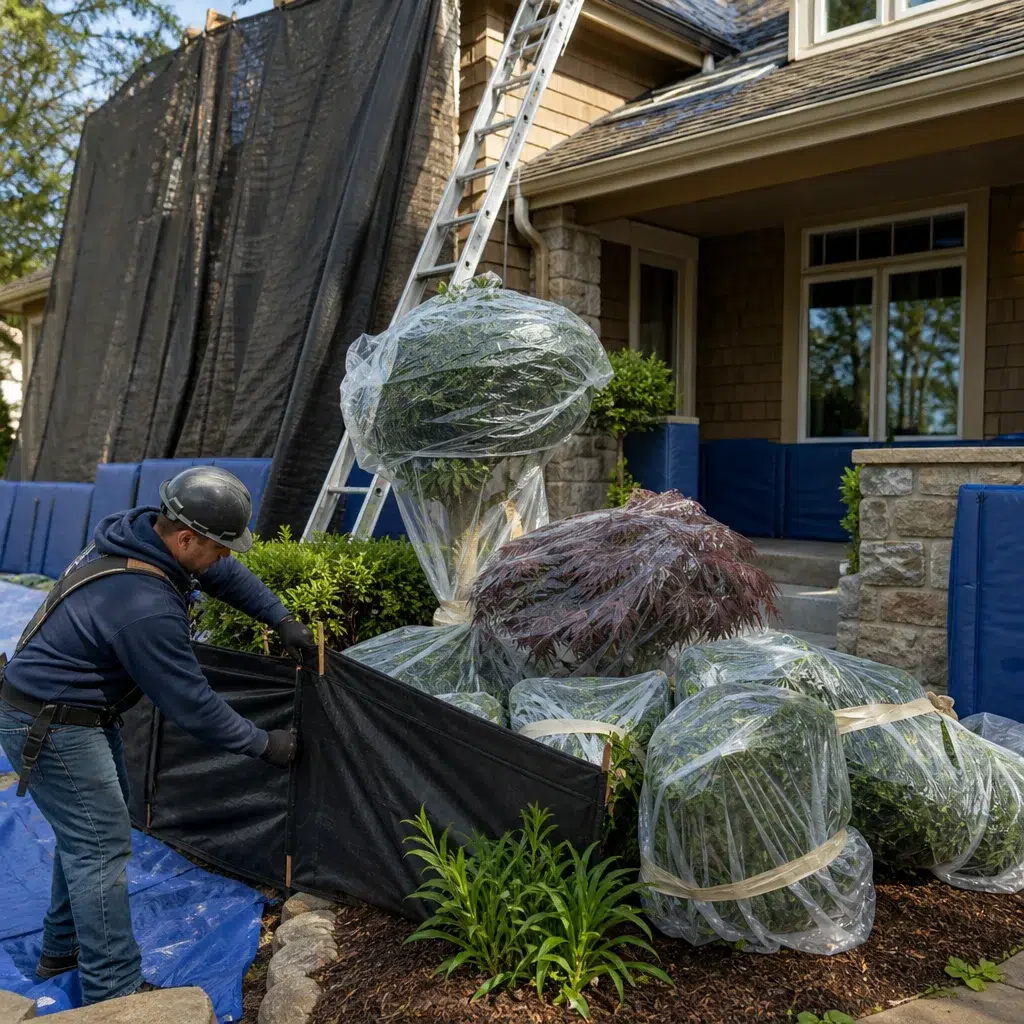
Ground-level herbaceous plantings receive different protection. Rather than barrier fencing that restricts access to plants, we cover beds with thick plastic sheeting secured with weight. This keeps debris off plants while maintaining moisture retention.
For commercial properties with extensive landscaping, we sometimes relocate valuable planters and potted specimens to protected storage areas during installation. This eliminates the risk entirely for high-value plants.
We also preserve drainage around landscaping. Roof runoff, particularly during pressure washing phases, can pool around plantings and damage root systems. We install temporary drainage channels that direct this water away from protected beds and toward designated areas.
Actionable takeaway: Identify your most valuable or vulnerable landscaping features before quotes are requested, and ask your contractor how they specifically plan to protect those plantings.
5. Driveway Protection Methods and Best Practices
Your driveway experiences direct impact from roof installation in ways many property owners don’t anticipate. Asphalt softens under foot traffic and equipment pressure, especially during warm weather. Concrete suffers scratches and gouges from dropped tools and equipment movement. Pavers displace or crack under concentrated loads.
We deploy layered driveway protection that addresses these specific vulnerabilities:
- Plywood sheeting: We cover driveways with 3/4-inch plywood sheets creating a protective surface that distributes equipment weight while preventing direct contact with your driveway material. This is the single most effective driveway protection method.
- Edge protection: Where plywood meets unprotected driveway, we secure supplemental edge protection to prevent sheet movement and load transfer to exposed edges.
- Surface padding: Under heavy equipment paths, we add additional cushioning layers that absorb impact and distribute pressure.
- Traffic route designation: We establish and mark specific pathways for crew foot traffic and equipment movement, keeping traffic patterns consistent rather than allowing random wear.
Timing matters significantly. In summer months when asphalt is soft, we increase protection thickness. During Wisconsin’s spring thaw when moisture penetration is highest, we add drainage considerations beneath protective layers.
We also protect against chemical damage. Pressure-washing solutions, degreasers, and sealant runoff can stain or damage driveway surfaces. We use containment barriers that prevent chemical migration and maintain drainage paths that direct runoff safely away from your driveway.
Actionable takeaway: If your driveway shows existing cracks or wear, ensure your contractor documents this in the pre-installation assessment so damage caused by installation is clearly distinguished from pre-existing conditions.
6. Equipment Placement and Ground Protection Strategies
Where crews park equipment and stage materials determines much of the damage pattern on your property. Contractors prioritizing speed place equipment based solely on convenience. We place equipment based on property impact.
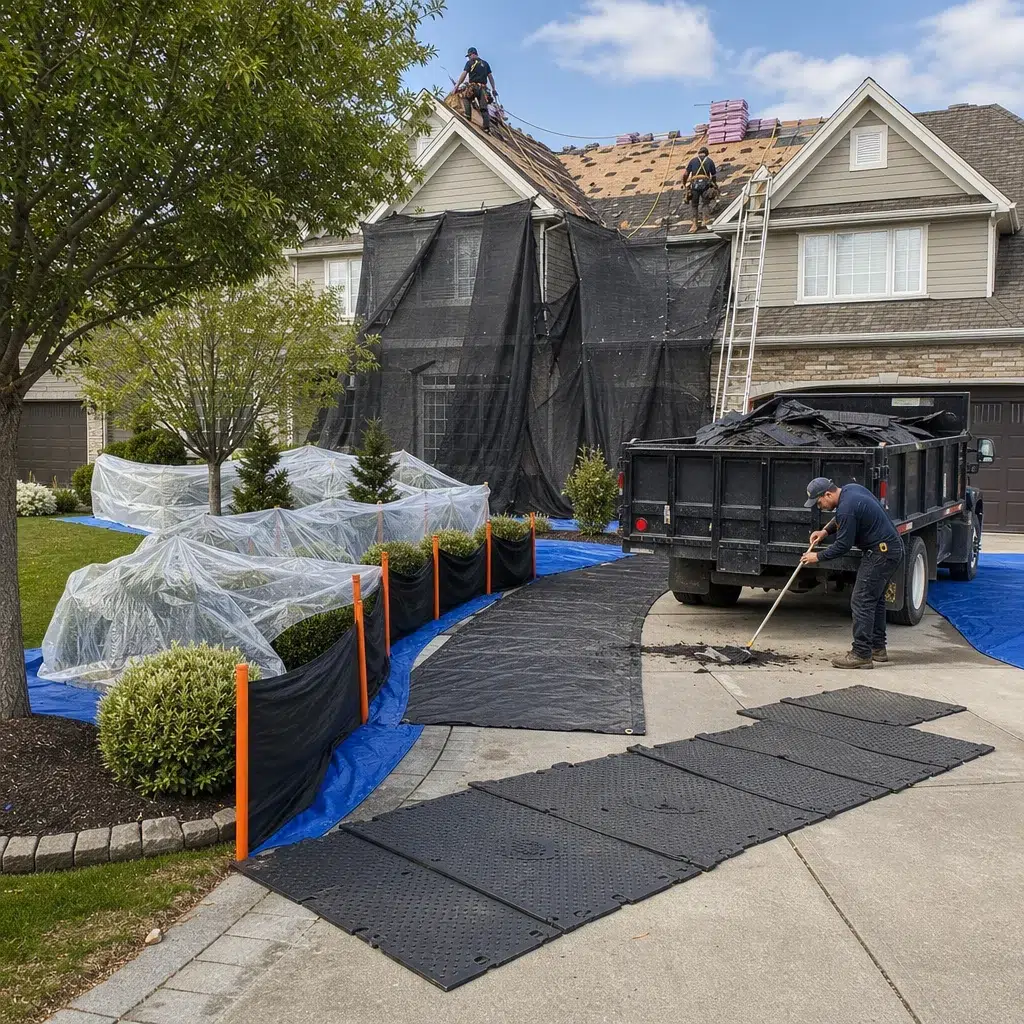
Our equipment positioning strategy includes:
- Load-bearing surface preparation: Before heavy equipment arrives, we prepare ground surfaces with protective layers. For landscaped areas, this might involve temporary plywood platforms. For driveways, we deploy comprehensive sheeting systems.
- Equipment pathway planning: We establish consistent routes for equipment movement, minimizing the total ground area affected. A single well-protected pathway causes less damage than random parking across multiple areas.
- Crane and lift placement: For steeper properties or commercial installations requiring aerial lifts, positioning becomes critical. We place equipment where it minimizes landscape impact and driveway contact.
- Ladder and staging area zoning: Crews need convenient access, but that convenience shouldn’t come at the expense of your property. We designate specific areas for ladder staging, ensuring ladders don’t rest against or damage siding, gutters, or landscaping.
- Staging area ground preparation: Where materials temporarily stage during installation, we prepare ground surfaces with protective layers that prevent material staining and equipment impressions.
For commercial properties with parking lots, we coordinate equipment placement to minimize disruption to tenant parking and maintain clear sightlines for building access. This professionalism distinguishes our work from installations that treat commercial sites like temporary dumping grounds.
Concrete equipment pads might seem costly, but they’re investment-grade protection. Rather than allowing equipment to sink into soil or compact landscaping, temporary concrete pads distribute weight across wider areas, preventing settling and damage.
Actionable takeaway: Before installation begins, ensure your contractor provides a written equipment placement plan showing exactly where vehicles, dumpsters, and staging areas will occupy your property.
7. Our Professional Cleanup and Restoration Process
Installation ends, but protection continues through comprehensive cleanup and restoration. This phase determines whether your property emerges looking untouched or like it weathered a construction site.
Our cleanup process includes:
- Debris removal and final sweeps: We remove bulk material first, then perform multiple passes with magnetic sweeps, shop vacuums, and manual collection to capture nails, small debris, and roofing granules. Driveways receive pressure washing (using controlled pressure that doesn’t damage surfaces) to remove dust and debris.
- Landscaping assessment and restoration: We inspect protected areas for any damage that occurred despite precautions. Crushed mulch gets refreshed, displaced gravel gets restored to its original areas, and any plant damage gets documented and corrected.
- Driveway restoration: Plywood sheeting comes up and gets properly stored. We inspect your driveway for any damage, photograph conditions, and create a record of the installation’s impact on your surfaces.
- Chemical remediation: If pressure washing or roofing sealants created staining or residue, we apply appropriate cleaning solutions and neutralizers specific to your driveway material.
- Final walkthrough: We complete a thorough property tour with you, addressing any questions about specific areas and ensuring you’re satisfied with site conditions before we leave.
For commercial properties, we coordinate cleanup around tenant schedules and parking access. We don’t leave parking lots partially unusable or drive drainage issues into landscaping. Professional cleanup reflects the professionalism of the entire installation.
The principle is straightforward: the job isn’t complete until your property looks better than it did before work started.
Actionable takeaway: Require your roofing contractor to include a detailed cleanup checklist in your contract, specifying what will be cleaned, how, and what timeline applies.
For further reading: Prepare property for roof replacement, DIY vs professional prep, Roof replacement process.